Pages

Friday, January 30, 2015

Recipe: Quick Banana Oat Cookies

These cookies are so quick to make... under 30 minutes and you have fresh cookies to enjoy. These are great for breakfast (it is banana and oats overall) with a nice cold glass of milk. Or also a nice healthy baked good for your kids lunchbox.
QUICK BANANA OAT COOKIES

INGREDIENTS:
2x Ripe Bananas
1 cup Rolled Oats
1/4 cup Choc Chips (optional)

METHOD:
1) Preheat the oven to 180 degrees, fan forces
2) Mash the bananas in a bowl, add oats and choc chips and stir to combine
3) Spoon mixture onto a baking tray. Place in oven for 15 minutes or until golden.

TIPS: You can add any add ins you like. I used choc melts (roughly cut as i ran out of choc chips) but you could use dates, sultanas, chia seeds etc. If not taking to school you could also add nuts. These are best enjoyed the same day. They have never lasted longer for me to know how good they are the next day.
 To save this recipe for later, click the title and pin this image

Thursday, January 29, 2015

Back To School: Morning Routine Printable

For some of your children school went back this week.. for WA it's not until next Monday. Master T is off to Pre-Primary (first full time year). Im excited but then I realised this is the start of daily school runs for me for the next 15 years! This means we need a good routine. Master T gets a little sick of me 'nagging' him so i thought id make him a chart for his room so he can see what he needs to do instead. Once Miss S is at school I'll pop it near school bags or in the activity room.

If you think this chart would work well in your house you can download your FREE copy but simply clicking the image. This will take you to the download link. It will print on A4 paper for you to trim down to 8x10" size. You could even frame it and use white board marker to tick off the activities as they are done.


*** FOR PERSONAL USE ONLY. Watermark will not be on your downloaded copy.

Wednesday, January 28, 2015

The Block: Triple Threat - New Teams

Yay The Block is back!! I'm so excited to be posting about The Block again... it's my favourite reno show. This season I will be working along side The Block Shop to bring you fantastic photos of the room reveals along with products to help you create a similar look.

So what is your first impressions of the new teams? I am a bit excited about a WA team. There is never many WA teams I guess with the show being on the other side of the country. I really hope they are one of the remaining teams. I don't think I have seen enough of the teams but by first impressions I'm unsure about Ayden & Jess and Brooke & Aimee. But time will tell!

Such a big challenge for elimination. No fake little room set ups with a decorating challenge this season. If you missed last night what is happening is all 6 teams are renovating a bedroom (reveal is tonight) then one team will be eliminated. The remaining 5 teams will then renovate living/dining space, again  one team will be eliminated at the reveal. Remaining 4 teams will then renovate a bathroom in 72 hours. Last team is eliminated and the remaining 3 teams will go to the real block complex. I think this is a great way to see who is the right fit for The Block.
I will say one thing though... please stop with the timber feature walls. They have been done to death on The Block and I'd love to see something new and different *hides from the timber loving fans*
Purple Team: Tim & Anastasia - SA
Blue Team: Ayden & Jess - QLD
Pink Team: Brooke & Aimee - VIC
Red Team: Mark & JJ - NSW
Yellow Team: Luke & Ebony - WA
Orange Team: Josh & Charlotte - NSW

In the coming weeks we will see our triple threat teams return to battle for a spot in the competition. Whilst Kim & Matt are a WA team i really do love Bec & George. I like their style and how positive they are. Which team are you hoping returns to the show?
I wonder which of these teams will be remaining in a couple of weeks!

So tell me, is there a couple that has given you a first impression... good or bad? A couple you know you'll love or hate?

Tuesday, January 27, 2015

Colour Pop: Charcoal & Mint

This weeks colour pop is inspired by my friends new lounge room. She has a fabric charcoal lounge with mint throw and cushions. I adore this combination.. it's stunning. So of course I had to make a baord with mint and charcoal goodness.
a) Freedom - Beaumont Mirror
b) Freedom - Noah Wall Clock
c) Leo & Bella - Pineapple Lamp
d) Freedom - Insignia Vessel
e) Beacon - Miami Table Lamp
f) Shop Inside - Aura Cross Throw
h) Freedom - Almeida Armchair (No link)
i) Jumbled - Volta Side Table
j) Lime Tree Kids - Jewellery House
k) Target - Lisa T Money Box
m) Hall About The House - Mint Arrows
o) Adairs - Majestic Ottoman
p) Beacon - Tatum Table Lamp
q) Lime Tree Kids - Low Wire Basket
r) Adairs - Oslo Cross Cushion


Monday, January 26, 2015

Happy Australia Day!!

Hope you all have a lovely Australia Day with your family.I suspect many of you will be enjoying a BBQ lunch or dinner. Julian is away so we have no plans but im thinking lamingtons with cream sounds like a perfect treat today!

Sunday, January 25, 2015

Jenni's Home Tour - Part 1

Today im really excited to share with you an amazing home... i gave you a sneak peek in December (see post here). Today i will be sharing the kids bedrooms with you. Next week i shall have part 2 of Jenni's house tour. The photos are taken by Jenni's husband... they are fantastic. He is very talented.. perhaps he should come take photos of my home for me!
I will leave you now with these gorgeous images to enjoy... all descriptions are written by Jenni.

Elodie's room started with the white bed from Domayne, and my love for the mint and pink combination has shone through in here. I first saw the Budgie Smuggler tea towel on Instagram and knew it would work well in here. My favourite item is probably the gorgeous origami paper light from Snowpuppe Studio in the Netherlands. It is so pretty, and I love the geometric shape of the folds. Two new additions are the Sprout and Sparrow Minty heart print and the colourful 'be happy' printable from kirliux (both Instagram finds).
BEFORE
AFTER

Oliver's room is evolving, but the Ikea shelves have been a recent addition to store books and a multitude of favourite superheroes. I bought the vintage world map poster and turned it into a wall hanging using timber dowel and string. My son loves to look at the map and see where we are located relative to other countries. The Acapulco chair is so versatile and comfortable and gets moved outside too on occasion! I've used a simple Ikea chest of drawers for storage to supplement the built in wardrobe, as well as an Ikea rug on the floor The word banner helps with letter recognition, and this quote from the Lego movie sets a fun mood. I mix up Ollie's bed linen, mostly with cotton on kids bed linen.

This room revamp was inspired by Angus' move to a bed from a cot. I started with the wall decals, as I wanted a monochrome base with bursts of colour. I love colour too much to go true monochrome, but it was a great base. I chose the Miniwilla Berg print from Yellow Dandy early on, along with the charcoal grey bed from Fantastic Furniture. I upcycled the chest of drawers as it had been in my parents' garage.The grey and white combination I chose works in great with the rest if the room. Other features include the lightning wall flag by Little Olive and Co, "Batman is sleeping" print by Mitahli Designs, and a Star Wars Lego Yoda light.

I hope you enjoyed seeing these kids rooms as much as i did. Stay tuned for part two!

Friday, January 23, 2015

Recipe: Cheesymite Scrolls

I was trying to decide whether I would do an Australia Day recipe or a back to school recipe this week. Instead i combined the two and made Cheesymite Scrolls which are perfect for lunchboxes!
CHEESYMITE SCROLLS

INGREDIENTS:
200g Natural Yoghurt
1 1/4 cup Self Raising Flour
Vegemite
Grated Cheese

METHOD:
1) Preheat oven to 180 degrees, fan forced.
2) Mix the flour and yoghurt together to form a dough
3) Lightly flour your bench and place ball of dough on there. Kneed for a couple of minutes
4) Using a rolling pin roll the dough our to form a long oval/rectangle shape
5) Spread vegemite over the dough and add cheese
6) Starting on one of the long sides roll the doll to form a log
7) Slice the log and place on baking paper onto a baking tray. Add cheese to the scrolls
8) Bake for 25 minutes or until golden

 To save this recipe for later click the title and pin this image


Thursday, January 22, 2015

How To Make: Hair Clip Cloud

I loved these mint cloud hangers as soon as I saw them. I purchased an adult size one with no real use for it. Once it arrived I knew it needed to be displayed in Miss S's room so came up with an idea to use it. I decided to make a cloud hair clip hanger for all her pretties. I'm happy with how it turned out.
HAIR-CLIP CLOUD

WHAT YOU NEED:
Cloud Hanger
Piece of scrapbooking paper
Ribbon
Scissors
Super Glue
Mini Pegs (or paperclips)

INSTRUCTIONS:
1) Draw raindrops on the card. I made a template with piece of paper and traced around so they were all the same size. Cut out the raindrops
2) Lay down the hander and cut pieces of ribbon at different lengths. Fold the told of the ribbon over the hanger, secure with a dab of glue and peg/clip ribbon together until glue dries.
3) Hang the hanger and check the lengths of ribbon. Adjust if needed
4) Glue the raindrops onto the bottom of the ribbon and peg/clip in place until glue dries.
5) Once glue is dry remove all pegs/clips and hang on the wall. Decorate with hair clips.

TIPS: I hung my hanger in my wardrobe whilst it dried overnight


Wednesday, January 21, 2015

Colour Pop: Monochrome + Yellow Pop

This week when trying to choose what colour combo/style i was going to do my mind kept going back to black, white with a pop of yellow. This combo is striking and would look great in most rooms. A little boys room with this colour combo is quite popular.
a) Freedom - Jasper Mirror
b) Target - Ampersand Print
c) Kmart - Classic White Clock
d) Freedom - Alonzo Cushion
e) Typo - Textured Jug Vase
f) Adairs - Archer Coal Towels
g) Fantastic Furniture - Viento Chair
h) Freedom - Scribe Canister 
i) Freedom - Clarity Lamp
j) Adairs - Marrakesh Throw
k) Target - Wire Ampersand
l) Freedom - Safi Frame
m) Target - Inspired Candle
n) Typo - Large Paper Tray
o) Target - Noughts & Crosses
p) kikki K - Weekly Leather Diary
q) Toucan - Arrows Pillowcase
r) Kmart - Ceramic Pineapple Jar
s) Freedom - Jax Wire Basket
t) Adairs - Oslo Cross Cushion

Tuesday, January 20, 2015

How to: Photo Wall

Photo walls can seem overwhelming. I've had friends joke about me flying over to help them with their photo walls. So I thought id write the steps I took to do my photo walls: large rectangle style + random style. I apologise now for a few bad iPhone photos - if only I knew I would be needing photos for a blog back then.

Rectangle Photo Wall:
1) Using newspaper or old wrapping paper cut all your frame sizes out.
2) Measure your wall and work out a rough size for your rectangle (the size may change as you do the layout).
3) Mark your rectangle on the ground with masking or painting tape (or you can just place items in each corner if you don't have any tape spare).
4) Start laying out your paper templates on the ground. Take photos of your layouts, looking at them on camera you'll spot what needs to change, or you can go through them to see which layout you like best.
5) Once you have decided on a layout measure around the edges to get your rectangle size.
6) Using chalk and a level draw your rectangle on the wall where you'd like the frames to be.
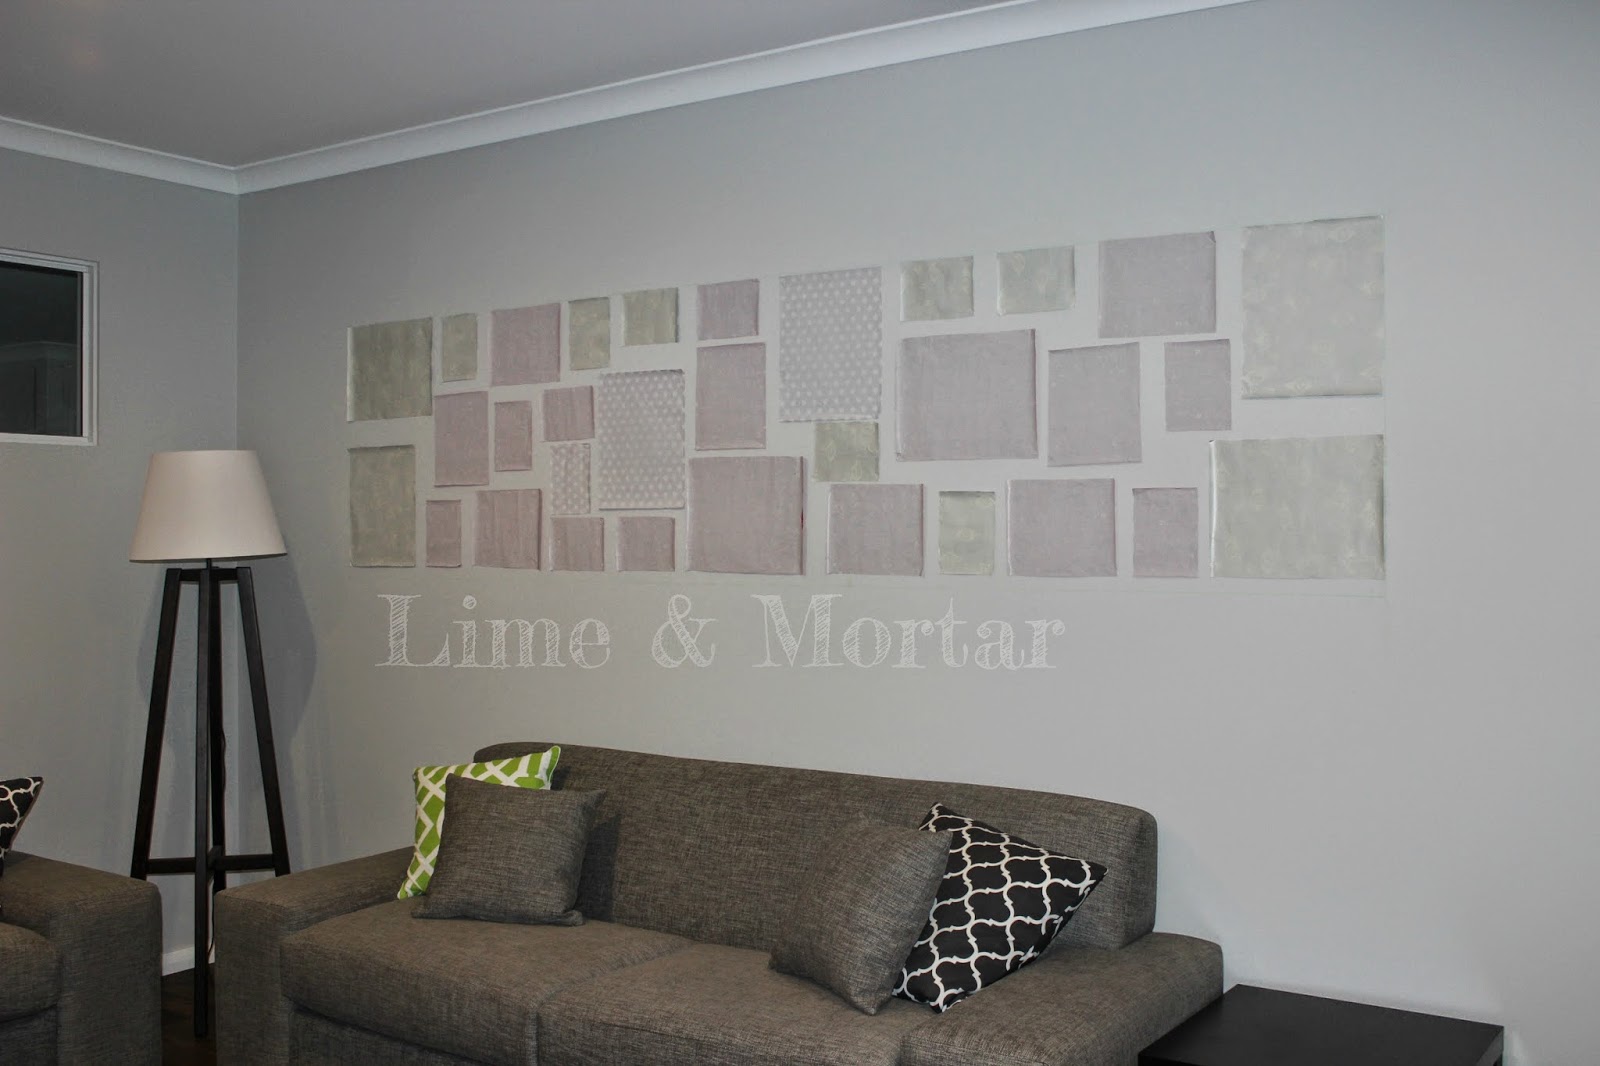
7) Blue tac all your paper frames in your desired layout on the wall.
8) Put all your photos into the frames
9) Now one by one remove a paper template and replace with the matching frame. I balanced a level on top of the frame as hubby was not home. If you have helping hands get them to hold the level for you to ensure the frame is straight. I used 3m velcro strips which allows you to remove easily if you need to adjust.


Random Photo Wall:
1) Using newspaper or old wrapping paper cut all your frame sizes out.
2) Measure your wall to see what space you are working with
3) Start laying out your paper templates on the ground. Take photos of your layouts, looking at them on camera you'll spot what needs to change, or you can go through them to see which layout you like best.
4) Once you have decided on a layout find the middle of your design and mark it on the paper template.
5) Next mark a spot in the middle of your wall - 2/3rds up from the ground. EG. If the wall height is 240cm then place the middle of your layout at 160cm from the ground.
6) Match the mark on the wall with the mark on the paper template.
7) Blue tac all your paper frames in your desired layout on the wall
8) Put all your photos into the frames
9) Now one by one remove a paper template and replace with the matching frame. I balanced a level on top of the frame as hubby was not home. If you have helping hands get them to hold the level for you to ensure the frame is straight. I used 3m Velcro strips so this allows you to remove easily if you need to adjust.


Monday, January 19, 2015

Back To School: Lunchbox Ideas

Master T started Kindy last year, i only had to make lunch 5 days a fortnight. I generally stuck to choose one item from each of these categories - main, fruit, dairy with sweet & savoury snack. Morning tea we were asked to bring a piece of fruit for the class to share.
My frittata cupcakes and pizza scrolls are perfect for lunchboxes

Term 4 i switched to bento style lunches using Yumbox. My kids loving having a mixed plate of food so this style lunch works well for them. I make Miss S a lunchbox on the day Master T had school as she enjoys it and its convenient to just take her lunch out fridge ready to go. Specially if we go out somewhere.

Here are some links to some fantastic lunchbox ideas for bento style lunches. I dont always make my fancy with the cute cutters you can get. If you live near a Daiso apparently you can get lots of great goodies for only $2.80. We dont have Daiso in WA so i got mine mostly from ebay and Little Bento World


Sunday, January 18, 2015

Kids Activity Room - Rainbow Makeover

I posted months ago I was going to give the kids activity room a makeover with a bit of shine and rainbow (see post here). Finally I have finished putting it all together so I can share some photos with you. My kids are really not into toys much so the playroom needed to be changed to suit their needs. It's more grown up and should last some time now.

I painted the wall the desks are on in Dulux 'Flooded Gum'. Then added silver polka dots just to add a bit of a feature to the room. Plus I really wanted to do polka dots somewhere. I used some of the spare dots in my powder room.

I added desks and chairs so they can sit and colour in or build lego or anything they like. Now my dining table will stay nice with no crayon or scratches and dents! Most the toys are now kept in their rooms which come off the playroom as they both have a lot of storage.
 I framed photos of the kids with their friends for them to enjoy. My mum had the kids names made at Christmas time. They are hand drawn with their favourite characters/things in them.

 My favourite part of this room... this whole set up!

Lime & Mortar: Rainbow & Cloud Print & Little Olive & Co: Fruit Banner

 Im sure our artwork wire will fill up again once Master T is back at school and Miss S starts playgroup again.